If you’re thinking about living the bus life, then you’ve probably started saving bus conversion photos on your Instagram or Pinterest account. The next step is planning out your layout. This is an iterative process that requires a lot of thought, and will have a huge bearing on the rest of your bus life adventures. This post covers considerations before you start planning, what you need, and how to find bus floor plans (or make your own).
Before you get started
Before you start on your bus floor planning, you’ll want to get measurements of your bus and take a note of a few things.
If you don’t own a bus yet, then read through all of the sections and use it to plan out your purchase. We planned our layout after we bought our bus, because we knew it would be big enough for the amount of travelers we had, and it was a good deal we couldn’t pass up.
First off, is your bus a conventional “dog nose” bus, or a flat-nose bus?

Is the engine in the rear, or in the front? You will probably lose floor space in the rear of the bus if you have a rear-engine bus.
How long is the bus? Skoolies can range anywhere between 22 and 40 feet in length. If you choose one of the pre-made plans we’ll share later, you will either need to match the length exactly, or make modifications based on your bus length.
Next up, how wide is your bus? Most full-size buses are about 7′ 6″ in width.
Does your bus have emergency exit doors, and if so, where are they?
A lot of skoolie floor plans use bus windows to help plan out the bus layout. For example, the bathroom might be two windows’ worth of bus length. Since you’re putting walls up in the bus, it’s convenient to have the walls match up with the framing between the bus windows. Count how many windows you have, and what the window (and frame) widths are.

Lastly, check out the underneath of your bus. You’ll need to mount tanks and install plumbing lines under the bus, and chassis parts/axles/etc might get in the way of your plans.
What Do You Need In Your Bus Layout?
Unlike buying a(n existing) house, most buses are blank slates. You get to decide what the layout will be, based on your needs and budget.
So before you get too far into the layout process, sit down with your partner or other future bus-mates and decide what you absolutely need in your bus. Make a list of nice-to-haves to.
This might include:
- A bathroom with toilet and shower.
- A full size fridge
- A co-pilot chair
- Bunks for kids or guests
- A main bedroom that has a door or other separation.
- Not being able to see the bedroom area from the front of the bus.
- Conversely, if you have kids, maybe you want to be able to see through the entire bus at all times.
- Doors to separate the living area from the sleeping area(s).
- A kitchen sink
- A desk or work space.
- In-bus laundry
- A dining table or other group eating area
- And so on.
You will likely have to sacrifice some of these things based on space, time, budget, or some combination of those three. You will also need to plan out how much water and electricity you want to use, and add the tanks, pumps, and battery space into your layout list.
I suggest making a Pinterest board of your favorite bus floor plan layouts and skoolie features.
DIY Bus Floor Plans
This was the route that we took, although there are a lot of great bus floor plans for sale in the next section!
Once we had an idea of what we wanted, and had an idea of how big the required battery and tanks/pumps would be, we started planning layouts.
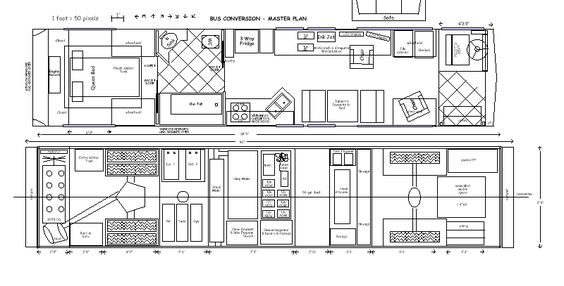
I drew multiple bus layouts on graph paper, with each square being the width of one bus window. I also cut out shapes to represent the bed, couch, toilet, fridge and other items we wanted to add in.
With multiple sets of these papers cut out, we tried out various bus layouts. It was helpful to each create several bus layouts, because that unlocked some new ideas we otherwise wouldn’t have thought of.
A few extra tips:
- Make sure you account for wheel wells.
- Make sure you have a walking aisle width of at least 24″ (preferably closer to 30″)
- For each thing you plan (sink, shower, etc) make sure that you are considering where the supporting equipment will go. Do you need tanks? A pump? Battery bank?
- See if you can find some local skoolies to tour.
You don’t have to do this entirely on paper, either. Check out this video from Rolling Vistas showing how to make a layout using Sketchup:
You can also use Floorplanner if you’d like another digital planning option.
Pre-Made Skoolie Floor Plans
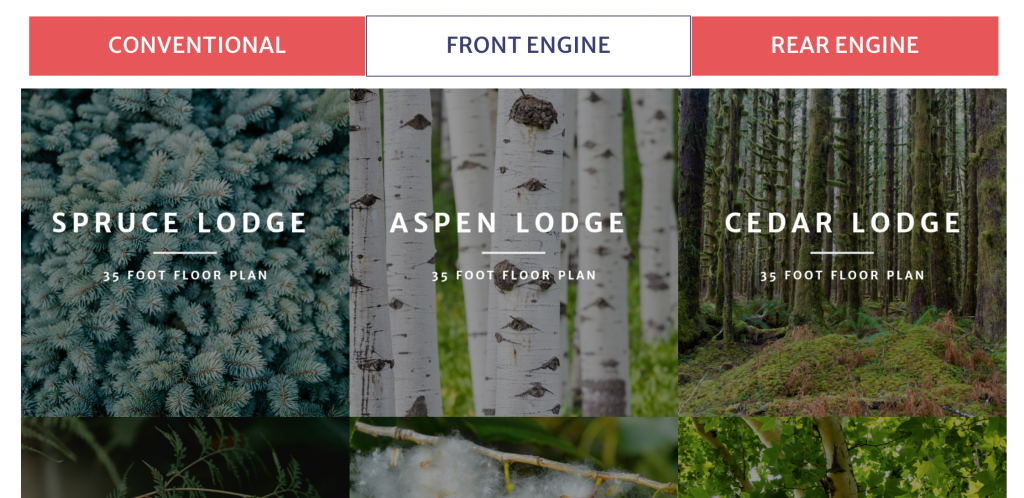
Far and away the most beautiful floor plans I’ve seen are from Skoolie Homes. Their website has options for conventional and flat-nose buses, and for rear and front engine layouts in all different lengths. With 20 different plans, there’s sure to be one that fits your needs:
There are a number of free floor plans available from Green Moxie:
You can find bus layouts on Etsy, too! For example, this bus layout plan includes a floor plan, material list, timeline, and more.